July 7, 2012

Sandy Beach Picture Frame


I love pictures. They are little cameos of memories that don’t take up a ton of space. Pictures can be piled into books, scrap booked or framed. Unique picture frames can also be created out of objects that are too big or awkward to scrapbook.


 I am a little ashamed to say that at 19 months of age my son went to the beach for the first time. Living in Southern California, there is really no excuse for him to have not been yet. Oh sure, we’ve walked down the pier or along the sand on our way to lunch or to meet friends at the coffee shop, but he has not had an official “beach day”. My dear friend and her 5 month old daughter also came along for her first beach day. To commemorate the big event I decided to create some unique picture frames; one for me and one for my friend.

I bought 2 simple wood frames from Michael's for $1 apiece. I took the frames to the beach along with Modge Podge (MP) and a foam brush that could be thrown away (easier than trying to find a sink to clean out a nicer brush). I spread the MP generously and as evenly as possible and then pressed the frame gently but firmly into the sand. Take several minutes and enjoy the beachy sunshine. Pull up your frame and do a second layer of MP and sand.


At home, spray the frame generously with a spray fixative to keep it from shedding too much sand into your house. Arrange your shells, rocks, seaweed, driftwood, etc. on your “sanded” frame. Hot glue the objects to the frame. If you would like, bring some sand home with you from the beach and use it to quickly sprinkle over the spots where the hot glue squeezes out from under your objects. Maybe it’s just me, but it drives me nuts when I can see dried hot glue when a project’s done. You have to do it while the glue is still hot though! You can also use clear nail polish on those shells and rocks that are so much more colorful when they are wet. 

 While these are not the prettiest shells that the beach had to offer, they are the ones that my son deemed interesting enough to pick up himself. This would be such a fun project for older kids to do from a special vacation. Let them take some plastic bags to collect objects to take home and fix to frames. Bring home sand from the river, acorns from the camp ground, or rocks from the hike. It will be so much fun for them to look back and remember those places that they were found.

July 2, 2012

Mud Run Shirts

So my sister, Hollywood, and I did the World Famous Camp Pendleton Mud Run last month. In preparation for this momentous occasion we decided that cute customized crop tops died hot pink were in order. Most people would be loading up on water and sleep the night before a 10k obstacle course, but not us! 

Kristin found an idea on the internet for dying t-shirts and leaving a design with Elmer's Glue. It very highly recommended the blue GEL School Glue. I went to 5 different stores before I finally found it at Staples for around $3 ( I can't find the reciept). I also bought 2 white tank tops from WalMart for $5 each, and a package of pink Rit Dye for $2.29 from JoAnns. 

First, write or draw what you want on your shirt with the Elmer's. We put a piece of cardboard in the shirt to keep the front from sticking to the back. Use a paint brush to work the glue into the fabric and crispify your design. Use a hairdryer to speed up the dry time.

Second, dye the shirts according to the package. We used the bucket method with the logical thinking that is won't work the glue out of the fabric.


Third, throw the shirts into the washing machine and wash according to the dye packaging. Don't forget to clean your washer afterwards to prevent ruining your next load of clothes. Dry!


We decided to crop our tops since we had been training since January to become fit enough to complete this run and our tummies are looking pretty darn good. Definitly the best I've looked since having my son a year and a half ago!

Check out those arms!

Poking my sister, Hollywood.
BEFORE
AFTER

Vicious Mud Warriors!


June 29, 2012

Viking Party Cupcakes

My son is eight months past his first birthday, but I had so much fun creating the cupcake cake that I really want to share it! My husbands' family has Norwegian heritage, so we thought it would be really fun to go with a Viking theme. It's surprising how few ideas there are out in the ethos for viking kids parties! It's a shame, really. I wasn't blogging in any form at that point, so the pictures are unfortunately not geared towards sharing on the net. Hopefully you can get the gist of it all!

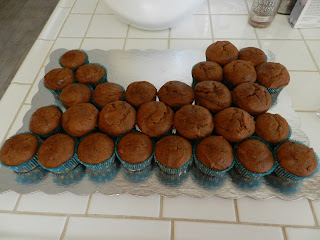
I modified the amazing pumpkin chocolate chip muffin recipe into cupcakes, leaving out the chocolate chips. In retrospect I shouldn't have messed with perfection, and left the recipe alone. I also made cinnamon cream cheese frosting with the aide of my sister, Hollywood.


I arranged the pumpkin cupcakes into a rough longboat shape.


Thanks to my oh-so-talented older sister, Hollywood, I dyed the frosting using Wilson concentrated frosting dye. Piping it onto the cupcakes was much easier, faster, and even than using a spoon or spatula.


Smoothing out the "wood". We didn't mix all the dye in really well so there was some variation in the color saturation.


Detailing the figure head and the water. Hollywood has a fabulous frosting tips collection to choose from.


Almost done, aaaaaaaand...


FINISHED! Complete with personal shield smash cake for the little gremlin. The small shield were made by decorating mini cupcakes.It took forever to get the dark green right!


The supervisor.


Impromptu water sensory "table" with Aunt Hollywood to unwind after being so patient while Momma decorated cupcakes.


June 27, 2012

Father's Day Toddler Gift


For Father’s Day this year I wanted to find a project that both my son and I could work on together to show Daddy how much we appreciated him. I looked and looked for something that he would really appreciate. Painting a tie or making a paper weight just isn’t our thing. Daddy doesn’t wear ties (and what dad really wears them beyond Father’s Day anyways?) and we don’t have a desk for a paper weight. Besides that, I am sorta anti nick-knacks. I really can’t stand things that have no purpose and take up valuable shelf space… unless it also has a use, which is different.

A toddler friendly craft!
I found this great idea revolving around cookies (what dad doesn’t like cookies?!). The original idea takes a Pringles package, have the child paint it, and then fill it with dad’s favorite cookie. Well, I hate Pringles and, unless you’re packing Oreos, the can really isn’t big enough for normal cookies. I found a can that works much better than Pringles, Pik-Nik Original Shoestring Potatoes. They taste like potato chips in more of a french-fries form, much tastier than Pringles. 

Anyways, I washed it the container and dried it as quickly as possible (it’s paper with foil). I painted it red all over to cover the printing and give the kiddo a clean canvas to work on. I handed him an old paintbrush and set up a paper plate with acrylic paint. I helped him by turning the can as he painted to keep him from overworking the colors into that nondescript form of gray that toddlers are masters at creating. We let it dry and I baked homemade chocolate chip cookies from scratch. I used a plastic bread bag to line the painted can since I don’t totally trust washed cardboard with acrylic paint all over it. The cookies fit perfectly, and we delivered the cookies to Daddy at work. There is always something about having special gifts delivered to you at work. Think about it, isn’t it fun when we gals get flowers at work? There’s something about having witnesses to your reception of a thoughtful gift. Guys like it too, it’s just harder to find a good opportunity.

                         BEFORE                                    DURING                                  AFTER!


June 23, 2012

Cheese Graters and Earring Storage

So I have storage issues in my home. It is VERY small, with very limited wall space. I also like having some negative space, which is a precious commodity. I have some of that precious negative space in my bathroom. As a rule, I don't hang artwork in bathrooms. The moisture and heat is terrible for canvas and paper. However, what about framing my earrings? I do not have any storage for my hanging earrings. It's fine to pile my stud earrings into my antique jewelry box, but it's rough on the pretty dangling ones. So it's Pinterest to the rescue!

Distressed picture frame with chicken wire.
I have been looking for a few weeks now for the perfect frame to turn into my jewelry rack. I finally found one that was the appropriate size and shape. I found two at my local thrift store for $2.95 each. I'll keep one the original naked wood for a photo. I removed the glass and the back board and spray painted it a bright blue. I waited for it to mostly dry and then spray painted over that with white. About an hour later I went at it with a fine grit sand paper and distressed it. If I do this again I'll probably use a slightly larger grit. I went to my parent's place and absconded with one of Mom's plant cages. I figured it was rusting and going to be useless soon anyways, right? I wire cut it to fit the frame, and since I couldn't find my staple gun (AAAAAAARG!!!) I very carefully hot glued it in. The frame already had hanging hardware so I was done!

          The Inspiration
          project cost: $2.95
          project time: 1-2 hours


The back side of the cheese grater earring tree.
I found an awesome idea to turn a cheese grater into an earring holder. I love up-cycling and re-purposing. I found this old cheese grater for $0.98 at the same thrift store. I cleaned it really well with dish soap and water and used some bright sunny yellow spray paint left over from another project. I would recommend painting the inside of it before the outside. I also highly recommend Rust-Oleum Painter's Touch Ultra Cover spray paint. I got some Krylon for another craft and I was sorely disappointed with it. I left the cheese grater outside all day to thoroughly dry.
       
          The Inspiration
          project cost: $0.98
          project time: 20 minutes 


BEFORE
AFTER


May 30, 2012

Pumpkin Chocolate Chip Muffins

My dear friend, Juliana, and I used to meet once a week and cook several meals for the whole week. I believe it was Tuesdays. We would each pick 2-3 recipes and buy the supplies for our chosen food adventure, enough for both of us to end up with one of all the meals. We both tended to share at least one tried and true recipe and then pick something new that sounded delicious. Juliana is an awesome cook, and usually made bread in her bread machine to go with one of her meals. The great thing about this is that Juliana had a totally different flavor pallet and I tried some new things that I may not have on my own. For example, gingered squash soup is delicious! My all time favorite recipe, though, is one she found on the internet. I can't find the original, I've searched and searched! If this is your recipe or you know the creator, please send me the link and I will gladly give credit! And here, ladies and gents, is the recipe for...

 PUMPKIN CHOCOLATE CHIP MUFFINS *glitter descends softly from the rafters as a small choir of heavenly angels gently sings to the muffins as they bake in their warm nest that is my oven*

(30 muffins)
  • 4 Eggs
  • 2 cups Sugar
  • 1 (16 oz / 2 cups) can Pumpkin
  • 1 teaspoon Vanilla Extract
  • 1 1/4 cups Vegetable Oil (yes, 1 1/4 cups)
  • 3 cups Flour (King Arthur for regular, Bob's Red Mill All Purpose Baking Flour for GF)
  • 2 teaspoons Baking Powder
  • 2 teaspoons Baking Soda
  • 4 teaspoons Cinnamon
  • 1 teaspoon Ground Cloves
  • 1 teaspoon Ground Nutmeg
  • 1 teaspoon Salt
  • 12 oz Semi-Sweet Chocolate Chips (Ghirardelli is my absolute fave for baking)


GHIRARDELLI!
1) In a large mixing bowl beat eggs, sugar, pumpkin, vanilla and oil until smooth.
2) In another bowl sift together dry ingredients and mix into pumpkin mixture. Fold in chocolate chips.
3) Fill greased or paper-lined muffin cups 3/4 full.
4) Bake at 400 F for 16-20 Minutes, or until toothpick comes out clean. {24 min/silicone (GF)} {26 min/silicone (wheat flour)}

Ta~Da!

Guess which are GF...that's right, well, left...the ones that are totally falling apart! They are still delicious though :)

The muffin pans that I use are actually silicone, which I love. They do take longer to cook, so keep that in mind. Don't forget to generously grease them! I would also recommend running a butter knife around the edges before trying to extract them, especially gluten free. I've made this recipe GF several times now, which typically doesn't take as long as regular wheat flour. I did note the modified baking times in the parentheses.

A well loved recipe.

This time I did try something new, coconut oil in lieu of vegetable oil. I will say that it does change it and I'm not quite used to it. It was lovely, don't get me wrong, but when you've made the same recipe scores of times you do tend to notice when something is changed. I am also fairly convinced that the high oil content is why these freeze so well! Seriously. These are the best "frozen/reheat-in-the-microwave-for-30-second/high-calorie-before-early-morning-workout-muffins" ever. I adore them and I know you will too :)

ENJOY!!!


Three Great Ingredients:
King Arthur Flours
Ghirardelli Semi-sweet Chocolate
Trader Joe's Organic Virgin Coconut Oil


May 29, 2012

Memorial Day

Yesterday was Memorial Day here in America. I had a sudden urge to create a tribute to all the men and women who sacrificed their lives to insure my own freedom. I have another blog for my business, The Painted Oven, and would love for everyone to check out my project and leave some feedback. Here is a teaser to entice you to venture further...


May 26, 2012

Avocado and Feta Grilled Cheese Sandwich

I made this a couple of weeks ago, but since I had taken a few pictures to share my delicious creation on Facebook I thought I should also share it here! Diana Meiczan's Green Goddess Grilled Cheese Sandwich was something I pinned on Pinterest and boy was it inspirational! 

UDI's Gluten Free bread

I didn't have any spinach, unfortunately, but I DID have avocados! And here in sunny southern California, we have beautiful avos. I used UDI's basic whole grain bread. As with most things GF, I recommend toasting the bread till it's just starting to brown. It falls apart otherwise.

I tried something I've never tried before, mayonaise on the outside. I always do my grilled cheeses in butter. Next time I make this I will either go with just the mayo or the butter, with both it was a tad oily.

I was also out of sliced cheese. However, I did have some good quality shredded cheese and feta. Limited ingredient breeds creativity. I added the shredded cheese and feta together in the pan, let it meld together, and then spread it via spatula onto the nearby toasting bread

To dress it up, I added some crushed red pepper. On top of all that was nestled the fresh avocado, some pink Himalayan salt, fresh cracked pepper, and the lazy cooks best friend, Season All.

Overall, it was delicious. I was in a salty mood, so I paired it with some black olives.

Short on space and not wanting to do more dishes than necessary, I used the avo peel :)

Even the toddler liked it! I made his on real bread and without the crushed red pepper.

Yummo!

 ENJOY!!!

May 25, 2012

Counting Snails

The weather was absolutely beautiful this morning. It was all misty and drizzly. Not only is it the perfect weather for cuddling up with a cup of coffee and your sweetheart, it's the perfect weather for stomping snails.

A beautiful drizzly day in the neighborhood.

 While snails typically disappear with the coming of daylight, they linger when the weather is cool and damp. As I was leaving mid morning to go do laundry I saw a couple of snails out for a stroll in the drizzle, so I stomped them. I saw a few more, so I stomped them too. Curious as to how many I could get rid of I started counting. 40 minutes later, I had circled my house and garden shed twice. How many terrestrial molluscs did I send up to the great garden in the sky? 293!!!

Good bye helix aspersa, better know as the common garden snail.

May 21, 2012

Savory Potato Salad, with a Kick

This week I have 2 different social days where I need to bring something delicious to eat. I stroller with another mom friend of mine on a weekly basis and she usually feeds me. This week I would like to contribute to lunch! I also have an all beach day with another mom friend the following day. We are planning on a picnic. Solution? Make one giant, delicious batch of savory potato salad, with a kick! 

I am not what I would consider a picky eater, but there are a few things in the food world that I prefer either savory or sweet. One of those things is potato salad. I am not real keen on potato salad made with sweet relish. I love it on burgers, not with potatoes. There are also just a few things in life that I feel confident in bragging about. Along with roasting chickens, chocolate chip cookies, and beef tacos is potato salad. This recipe is an hybrid of my own, originating from my mom and grandma's recipes.

As with most on my non-baking recipes, the ingredient measurements are a guesstimation and can be adjusted to suit your own taste.

I always use red potatoes for potato salad. They stay firm, and I love their smooth texture. I cooked about 12 medium red potatoes in for a big batch. Plop them in whole in boiling water with a healthy shot of Sriracha Hot Chili Sauce. It gives a light hidden heat to the salad that takes it to the next level. If that thought doesn't thrill you, just add some salt.

SRIRACHA HOT CHILI SAUCE. Best of all? Made in the USA!


I peel half of the potatoes. I like the skins, but feel like it's overwhelming if you leave it on all the potatoes.


 I am so blessed to have a mom that has her own chickens, ergo, fresh eggs! I added 8 of them to boiling water for 10 minutes. I then immediately dumped the hot water and ran cold water over them for a minute or so to stop the cooking. I left them in chilled water till they are cool enough to peel. Cut them up and add to the warm potatoes.


 I love celery in potato salad. In my opinion, it NEEDS celery. If you are out of celery you can just use celery seed, although I do both. I finely cut about half a full sized celery stalk. I also added about 2/3 of a sweet onion.


 At this point I was running out of room in my biggest bowl, so back into the potato pot it all went. Into that went mayonnaise (Best Foods is my fave), plain ol' yellow mustard, a healthy dose of celery seed, a whole small jar of dill relish (I used Heinz this time) and a teaspoon of vinegar. Of course, if you're bent on using sweet relish you can substitute it for the dill.

Notice the red ring from cooking the potatoes in hot chili sauce?
 I spooned all the potato salad into several tupperwares to chill overnight. I like mine really cold, although I have some family members who like it while it's still warm. My own new addition to this recipe is the discovery of Tony Chachere's Original Creole Seasoning. My cousin brought it from a visit to New Orleans.


 If you want a lot of KICK to your salad be generous with it! I added just a little since the hubby doesn't like things too spicy and just add more to my own portions.

Tony Chachere's Original Creole Seasoning. Yummo!

ENJOY!!!