June 29, 2012

Viking Party Cupcakes

My son is eight months past his first birthday, but I had so much fun creating the cupcake cake that I really want to share it! My husbands' family has Norwegian heritage, so we thought it would be really fun to go with a Viking theme. It's surprising how few ideas there are out in the ethos for viking kids parties! It's a shame, really. I wasn't blogging in any form at that point, so the pictures are unfortunately not geared towards sharing on the net. Hopefully you can get the gist of it all!

I modified the amazing pumpkin chocolate chip muffin recipe into cupcakes, leaving out the chocolate chips. In retrospect I shouldn't have messed with perfection, and left the recipe alone. I also made cinnamon cream cheese frosting with the aide of my sister, Hollywood.


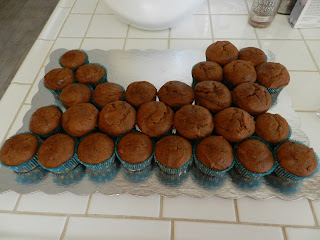
I arranged the pumpkin cupcakes into a rough longboat shape.


Thanks to my oh-so-talented older sister, Hollywood, I dyed the frosting using Wilson concentrated frosting dye. Piping it onto the cupcakes was much easier, faster, and even than using a spoon or spatula.


Smoothing out the "wood". We didn't mix all the dye in really well so there was some variation in the color saturation.


Detailing the figure head and the water. Hollywood has a fabulous frosting tips collection to choose from.


Almost done, aaaaaaaand...


FINISHED! Complete with personal shield smash cake for the little gremlin. The small shield were made by decorating mini cupcakes.It took forever to get the dark green right!


The supervisor.


Impromptu water sensory "table" with Aunt Hollywood to unwind after being so patient while Momma decorated cupcakes.

June 27, 2012

Father's Day Toddler Gift


For Father’s Day this year I wanted to find a project that both my son and I could work on together to show Daddy how much we appreciated him. I looked and looked for something that he would really appreciate. Painting a tie or making a paper weight just isn’t our thing. Daddy doesn’t wear ties (and what dad really wears them beyond Father’s Day anyways?) and we don’t have a desk for a paper weight. Besides that, I am sorta anti nick-knacks. I really can’t stand things that have no purpose and take up valuable shelf space… unless it also has a use, which is different.

A toddler friendly craft!
I found this great idea revolving around cookies (what dad doesn’t like cookies?!). The original idea takes a Pringles package, have the child paint it, and then fill it with dad’s favorite cookie. Well, I hate Pringles and, unless you’re packing Oreos, the can really isn’t big enough for normal cookies. I found a can that works much better than Pringles, Pik-Nik Original Shoestring Potatoes. They taste like potato chips in more of a french-fries form, much tastier than Pringles. 

Anyways, I washed it the container and dried it as quickly as possible (it’s paper with foil). I painted it red all over to cover the printing and give the kiddo a clean canvas to work on. I handed him an old paintbrush and set up a paper plate with acrylic paint. I helped him by turning the can as he painted to keep him from overworking the colors into that nondescript form of gray that toddlers are masters at creating. We let it dry and I baked homemade chocolate chip cookies from scratch. I used a plastic bread bag to line the painted can since I don’t totally trust washed cardboard with acrylic paint all over it. The cookies fit perfectly, and we delivered the cookies to Daddy at work. There is always something about having special gifts delivered to you at work. Think about it, isn’t it fun when we gals get flowers at work? There’s something about having witnesses to your reception of a thoughtful gift. Guys like it too, it’s just harder to find a good opportunity.

                         BEFORE                                    DURING                                  AFTER!


June 23, 2012

Cheese Graters and Earring Storage

So I have storage issues in my home. It is VERY small, with very limited wall space. I also like having some negative space, which is a precious commodity. I have some of that precious negative space in my bathroom. As a rule, I don't hang artwork in bathrooms. The moisture and heat is terrible for canvas and paper. However, what about framing my earrings? I do not have any storage for my hanging earrings. It's fine to pile my stud earrings into my antique jewelry box, but it's rough on the pretty dangling ones. So it's Pinterest to the rescue!

Distressed picture frame with chicken wire.
I have been looking for a few weeks now for the perfect frame to turn into my jewelry rack. I finally found one that was the appropriate size and shape. I found two at my local thrift store for $2.95 each. I'll keep one the original naked wood for a photo. I removed the glass and the back board and spray painted it a bright blue. I waited for it to mostly dry and then spray painted over that with white. About an hour later I went at it with a fine grit sand paper and distressed it. If I do this again I'll probably use a slightly larger grit. I went to my parent's place and absconded with one of Mom's plant cages. I figured it was rusting and going to be useless soon anyways, right? I wire cut it to fit the frame, and since I couldn't find my staple gun (AAAAAAARG!!!) I very carefully hot glued it in. The frame already had hanging hardware so I was done!

          The Inspiration
          project cost: $2.95
          project time: 1-2 hours


The back side of the cheese grater earring tree.
I found an awesome idea to turn a cheese grater into an earring holder. I love up-cycling and re-purposing. I found this old cheese grater for $0.98 at the same thrift store. I cleaned it really well with dish soap and water and used some bright sunny yellow spray paint left over from another project. I would recommend painting the inside of it before the outside. I also highly recommend Rust-Oleum Painter's Touch Ultra Cover spray paint. I got some Krylon for another craft and I was sorely disappointed with it. I left the cheese grater outside all day to thoroughly dry.
       
          The Inspiration
          project cost: $0.98
          project time: 20 minutes 


BEFORE
AFTER